How to Effectively Enable Virtualization in BIOS for Modern 2025 Systems
Enabling virtualization in the BIOS setting is essential for modern computing environments, especially for those running virtualization software or creating virtual machines. In this guide, we’ll walk you through the straightforward process of enabling virtualization, focusing on both Intel VT-x and AMD-V technologies. This comprehensive approach covers accessing your BIOS setup, adjusting settings, and ensuring your system is properly configured for virtualization.
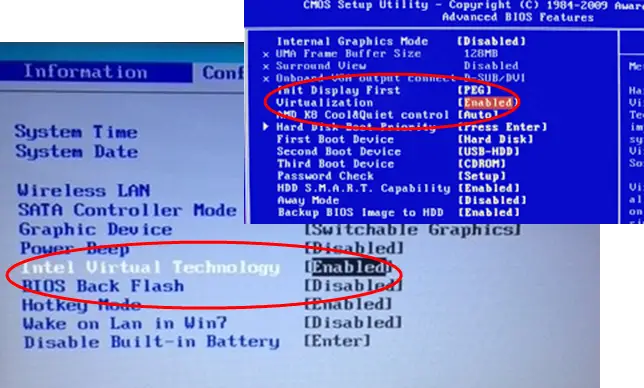
Accessing BIOS Setup for Virtualization
Before you can enable virtualization technology, the first step is to access BIOS. Each motherboard manufacturer has different keys associated with entering the BIOS menu, commonly known as the BIOS access key. Usually, this can be the Delete key, F2, or Esc, depending on the system manufacturer. To enter your BIOS setup:
- Reboot your computer.
- During the boot process, repeatedly press the dedicated BIOS access key.
- If done correctly, this will bring up the BIOS setup screen where you can configure settings.
Understanding how to enter BIOS setup is vital for anyone looking to enable virtualization options. If you miss the opportunity to enter setup, you’ll have to reboot and try again. After accessing the BIOS, navigate to the advanced BIOS settings or the main menu to find the relevant virtualization options.
Identifying Virtualization Options in BIOS
Once in the BIOS menu, locate the section dedicated to CPU configuration or advanced CPU settings. There, you should find options pertaining to the virtualization technology specific to your processor. This includes:
- Intel VT-x for Intel processors
- AMD-V for AMD processors
- VT-d for Intel virtualization technology for directed I/O, which can enhance performance settings
- SVM (Secure Virtual Machine) mode for AMD processors
Check each of these options. If they are not currently enabled, you will need to change them to access virtualization capabilities. This is essential for running virtualization software, which facilitates the creation and management of **virtual machines**.
Enabling Virtualization Technology
Having located the virtualization settings, proceed to enable them. This usually involves highlighting each option and switching it from Disabled to Enabled. Here’s a brief procedure:
- Select the option such as Intel VT-x or AMD-V.
- Change the setting to Enabled.
- If applicable, do the same for VT-d or SVM.
After making these changes, you must save and exit the BIOS configuration. Generally, you can do this by pressing the designated key (commonly F10) and confirming any prompts to save changes before rebooting. That’s how you can effectively set the system BIOS for virtualization.
Configuring UEFI Settings for Virtualization
Modern systems often use UEFI (Unified Extensible Firmware Interface) instead of the traditional BIOS. Accessing UEFI involves similar steps as traditional BIOS, but the interface may be more user-friendly. UEFI settings for virtualization are equally important. Adjusting these properly can significantly influence the performance of hardware-assisted virtualization on your machine.
Virtualization Support Check
To ensure that virtualization is enabled correctly, you can check your operating system settings. For Windows users, follow these steps:
- Press Ctrl + Shift + Esc to open the Task Manager.
- Go to the ‘Performance’ tab.
- Check under the CPU section for “Virtualization: Enabled.”
On Linux systems, you can verify virtualization support through the terminal. Use the command lscpu and look for virtualization flags indicating Intel VT-x or AMD-V support. This ensures that the BIOS settings have been properly configured and activated.
Troubleshooting Common Issues with BIOS Settings
Sometimes users encounter issues when trying to enable virtualization in BIOS. If you checked and confirmed that virtualization is still not enabled, consider:
- Checking for a BIOS update. Manufacturers release updates to enhance compatibility and functionality.
- Resetting BIOS settings to default, as previous configurations may interfere with virtualization.
- Looking into BIOS features that may be affecting virtualization, such as Secure Boot options.
Troubleshooting these elements ensures a seamless configuration process when enabling virtualization settings for better performance in virtual machines.
Performance Settings Relevant to Virtualization
A key benefit of enabling virtualization technology is enhanced performance in virtual environments. Several performance settings are tied directly to how virtualization is configured in the system BIOS or UEFI. To maximize this potential, consider the following:
Adjusting Performance Settings in BIOS
Beyond simply enabling virtualization, aligning performance settings with these options is crucial for optimal operation. In many BIOS setups, you’ll find categories related to CPU performance and hardware virtualization. Key points include:
- Enabling features like Turbo Boost or Dynamic Frequency Scaling
- Setting core affinity settings to optimize how resources are distributed among virtual machines
- Adjusting power management settings to offer consistent performance for intensive tasks
Ensuring these performance features are enabled while virtualization is activated can lead to a significant boost in efficiency, making a huge difference for developers and gamers alike using virtualization software.
Understanding Virtualization Modes and Their Setup
When configuring systems for virtualization, it’s vital to understand different virtualization modes available. These include:
- Full virtualization, allowing guest machines to run independently.
- Paravirtualization, where the guest OS is aware it’s running within a virtual machine and can share hardware resources.
- Nesting virtualization, where you can run virtual machines inside other virtual machines.
Knowing which mode to set depends on your intended use case. This helps configure the system BIOS to be not just enabled but also optimized for virtualization according to your needs.
Key Takeaways
- Access the BIOS setup using the appropriate key for your system.
- Locate and enable the necessary virtualization options like Intel VT-x or AMD-V.
- After enabling, check OS settings to confirm virtualization is active.
- Troubleshoot any issues by considering updates and configurations that may influence enablement.
- Optimize performance settings alongside enabled virtualization to enhance gaming and development tasks.
FAQ
1. How can I check if virtualization is enabled in Linux?
You can check if virtualization is enabled in Linux by opening a terminal and running the command lscpu. Look for “Virtualization” in the output information which will confirm whether Intel VT-x or AMD-V is enabled.
2. What should I do if I cannot access the BIOS on boot?
If you’re having trouble entering BIOS, verify you’re pressing the correct BIOS access key for your motherboard. Each manufacturer has its specific key. Also, ensure that your keyboard is plugged in; sometimes, USB keyboards may not function early on in the boot process.
3. Can virtualization be enabled after installing the operating system?
Yes, virtualization can be enabled after the operating system is installed. You need to access the BIOS or UEFI, enabling the appropriate virtualization settings, and then it will be recognized by your operating system after rebooting.
4. Is there any performance impact when enabling virtualization?
Generally, enabling virtualization should not negatively impact performance. In fact, it often improves overall system performance for virtualization software, as it allows the CPU to optimize how resources are allocated among multiple tasks.
5. Are there specific requirements to enable virtualization?
Yes, the main requirement is that your CPU must support virtualization technology, such as Intel VT-x (for Intel CPUs) or AMD-V (for AMD CPUs). Additionally, ensure your BIOS supports these features and is updated if necessary.
6. Is it safe to enable virtualization in the BIOS settings?
Enabling virtualization is generally safe and recommended if you are running modern applications that require it. However, review your security policies as certain threats could exploit virtualization environments.
7. How do I reset BIOS settings to troubleshoot virtualization issues?
To reset BIOS settings, enter into BIOS setup during boot, find the option to load default settings, usually termed ‘Load Default,’ ‘Reset to Default,’ or ‘Restore Defaults,’ save the changes, and reboot your system.